Jack McCausland
Jack McCausland
Photography, Graphic Design, Media
In this quick session, we were given a range of images to select from, which we have to make into an advert of our choice.
As we were doing so, we had to consider the audience of the product we were advertising, and link that image in with it, weather it was subject, or the colours.
For my first poster, I was looking out for an image which looked like it had potential, but didn't really shine through in the photography. So to begin with, I chose this image of Usain Bolt runing in an abandond area. I'm no sport finatic, and little did I know that he was being sponsored by Puma at the time, but I decided to make him go Nike.
I decided to turn the image black and white, because the original image was dead in colours, and were very negative, so the way I solved that, was to turn it completely black and white. Even though this was just a natural reaction, I do think that the audience that Nike sell to, would go towards more of a clean, black and white look, opposed to an unclean coloured image.
I decided to use the large NIKE font / logo as a background, behind Usain Bolt, to instantly notify who the company was, and what they might be suggesting / offering.
Along with a load of other effects and adjustments, I think I really like the end resault. The image looks completely different to the original, and I think it just works as an advert.
For my second poster, I chose this image. I hated the original image. It gave no hint on what audience it was made for, as the watch looks very expensive, and deserves a better - more sleek - background and surrounding than what looks like a plastic, cheep blue object of some kind. 'Naff', I think was the word I was looking for.
So I started by opening it in CameraRaw - Photoshop, and turned the image completely black and white, but by turning the Blue, Green, and Aqua's luminance up all the way, this insantly made the background stand out. As this was now mostely white, I then got read of the lines which appeard across the photo, blended it in using colour select and content aware fill, and by rotating it, I think It was finished.


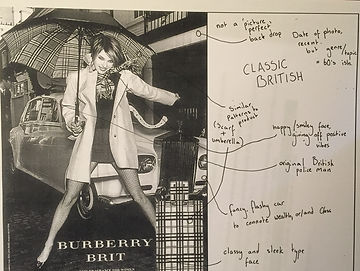
In this session, we had a look at Burberry Brit posters, and critically anylised them right down to the finest detail, and then had a go at re making them our selves.
At first - when we were looking at the original poster - we were picking out the objects used in the poster which might have been done on purpose to link with the situation or product, for example; the umbrella the woman is holding and the scarf she is wearing has the same classic pattern, commonly used by Burberry Brit. The policeman and the fancy expensive car in the background also suggest that it is a classic British photo. Everyone of these things link to the product and service it's self so it'll engage the audience in more of a visual way.
when I tried remaking something a long these lines, I struggled. Becuase I had no model, no burberry clothing, and didn't live in an urban, typically burberry british place, it was almost impossible to re-create something like this, so I had a look at some old photos from the summer which might have the slightest british / fashion look to it, and used that.
Our second task was to make an advert for a certain genre of product that we were given. I was given the topic of 'drink'. I instantly thought of all of these rugby supported drinks - such as guinness - and grabbed this png logo off of the internet, played around with it a little to suit my image more.


In this session, we were given spaces to create 3 different poster ideas off of the top of our heads.
We had to use different advertising techniques, weather this is humour, sexual, or emotion etc...
Once we created these 3 posters, I passed it round the class to see how effective these type of advertisment was, and see if they could stop the technique that I used, whether it was humerous or not.
After this, I really liked the idea of advertising coffee in my poster, so I went to the sketching bored and started planning out my poster which I could use for the actual thing.
I had an Idea of having a mostely white, clean, studio look to my poster, and to have a couple of mugs in the photo - partly full - with a nice heading, caption, logo and other graphics, and as the audience holds their Augmented Reality app over the poster, it comes to life. It doesn't change it terms of subject, but the mugs, coffee, text, logo and everything stays, but more coffee is poured from a jug into the coffee in slow motion. I will be filming this on an iPhone, as this enables me to do slow motion AND also - because this will obvioulsy be viewed on a phone - means that the quality will already be perfectly optomised for phone use, and viewing.
Although this isn't hugely obvious in what genre I'm using, and to what audience I'm aiming at, I'm simple aiming at coffee lovers, and the idea is that this slow motion, moving image of warm coffee pouring into the mug, will warmly invite viewers into having a coffee at chosen company.

Getting to know the computers and the software!
As a little exersize to help us with our final production, we have a look at how to animate still objects. We could use this in our final piece, but if we will or not, this will cover the basics in AfterEffects, and looking at how this software operates.
We fetched an angle poized lamp png off of the internet in the sight of having it jump and move along like the PIXAR lamp at the start of PIXAR movies. This will mean we'd have to add motion, scale, roation, and motion blur to the object to acomplish these resaults.
Using the 'stop watch' in after effects, and timing each motion - whether it's scale, position, or rotation - to a specific task every frame. Once put together, with motion blur on top, it can give very good resaults.
This really opens up a lot of ideas for me, and my final moving AR image.
We then learnt how to save the composition and 'flattern' it, which can then enable us to dublicate this, and repeat this process again and again, at different times and positions.
I had a go at making a little 'advertisment' for my own use on instagram which will eventualy show the launch of my new website.
In after effects, using images and only images, I put together this using the same techniques as taught class. These techniques are really something I'd like to use in my final animation.
As I was setting up the 'studio', playing around with lighting, angles, contrast, and colours, I decided to go towards more of an abstract, high contrast view.
I placed a large white background behind the frame which meant I could use a white background on my poster, and this could make it a lot easier to add text and such; this also doubled up as a reflector, bringing some brightness to the shadows, and making it more of an all rounded, even image.
I place the ring flash as an angle where it'd catch all the detail off of the steam, and droplets, and also where the reflector behind the object could catch a nice angle of light, giving off a softer look.
I used an iPhone 6S plus, which meant I could record high quality footage at 240 frames per second. This enabled me to slow the footage right down, which made the droplets easier to look at, and view. This also meant that when coming to view the end resault on a mobile, this would already be rendered and perfect to view on a phone screen which a high quality display.
It would have been uneccasary to record on a large filming camera in 4k, when it will only be viewed on a smaller, 1080p - at max - smart phone.


When I came to editing, I simple chose the company name Black Coffee. I wanted this to be big and bold, and take up the majority of the title area.
I also changed everything - including the footage - to black and white, and increased the contrast using curves, which enhanced on the fact that it was Black Coffee.
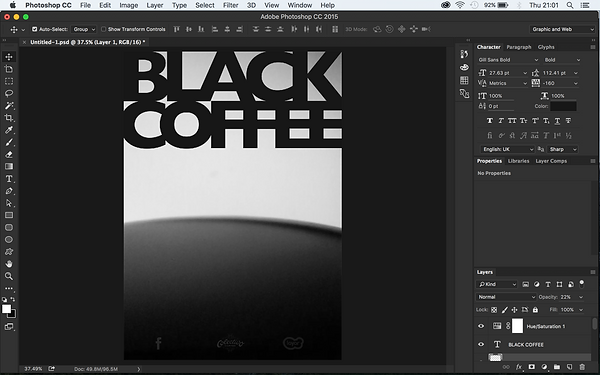
When I decided to what footage to use and what timing, I saved the frame of the footage to when the coffee was still, so I could make my poster (JPEG) on that.
Once I put together and decided on all of the text, logos and colour, I saved it as a JPEG, and then went on to delete the background and anything else which meant that the text would stand along, so I could then save it as a PNG and use it in my video.
Once I had the text and logos alone, without the image, I could then go onto save it as a PNG without replacing the JPEG. I opened this up in premiere pro, by simply dragging in the same video as I used for the poster's screenshot.
I made sure that I started the video the same time as I took the screen shot for the poster. This would mean that it would be a smooth transition to a still poster image, to a moving video clip.
Once I got the positioning the same as in the poster, and the contrast and colour the same, I saved it and exported it down into an MP4. This will enable me to upload it onto vimeo, and then onto Layar, to put together my design.
