Jack McCausland
Jack McCausland
Photography, Graphic Design, Media
As I put together my shooting place, I started by putting the cameras up at the chosen angles, settings and hights to which I wanted, depending on the subjects position. I decided to have two different cameras pointing at two different subjects at two different angles. This would provide me with twice as much footage as if I just used one camera, and also mean I could get different angles.
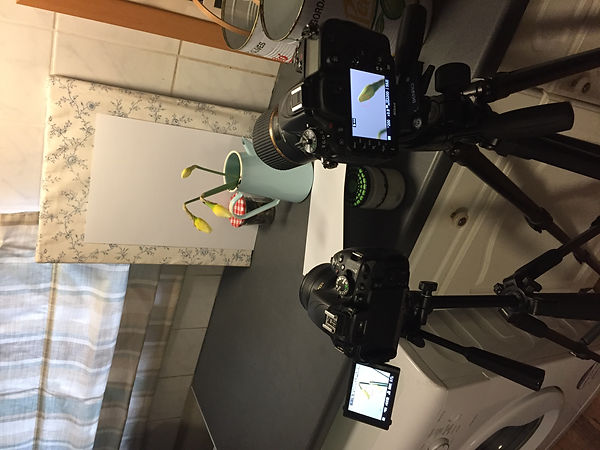
When I got my cameras set up, I then paid attention to each indervidual frame, looking at contrast, colours, and background. I introduced some reflectors and white backgrounds to the scene. This meant that the subject would have an even light, even when using artificial light when photographing over night.
When I did my first timelapse, I wasn't quite sure on how long I should do it for, what setting I should have it in, or what interval I should have. So this first one was a bit of a guess. I guessed how long it will take for the deffodils to open (roughly over night, 10 hours) and then I decided on how long I wanted this certain clip to last - 15 seconds ish. From this infomation, knowing that I am wanting 25 frames per second in my video, I multiplied 15 seconds by 25, which gave me 375. 375 is the amount of photographs I would have to take to last 10 seconds at 25 frames per second.
Now I know the mount of frames I need to take in 10 hours, I then divided this to work out the interval of the timelapse. 375 divided by 10 (hours) is 37.5. 37.5 divided by 60 (minutes) is 6.25. I would need to take one frame every 6.25 minutes to acomplish my 25 frames per second, for 10 minutes.
For both of these timelapses, I will be shooting the whole process in the smallest format of JPEG possible. I would normally shoot in RAW, however, this will be completely un suitable for this task. This is because, 1) 9'000 frames (which is what it will take to produce 6 minutes of timelapse for 25 frames a second) all shot in RAW will - roughly - take up 150 or so GB of storage on my computer, and will take forever and a couple of days to upload / import / render and such... 2) RAW is only suitable for the one off shots, as I provides insane detail and data which isn't only the pixles you see first off,this will not be neccesary for the perspose of my shooting, as I will not be importing every single one into photoshop, to fine tune each and every photographs. 3) a high quality file like this is ten times more the quality of a frame when put into video (1080 p) format, therefor, a load of pixles and data will be lost as soon as it's exported into a video file.
On the other hand, the reasons why I will be shooting in Small, JPEG files is so I can get enhanced image quality straight from the camera - which will require less time and effort once in the software, and also, it is already nearly the quality and size I will need for a 1080p video, even thoughh the pixles will still be the same as a RAW. As this isn't something which will be viewed on a high quality computer screen, there is no need at all to have all this DATA, and quality. This is why I will be shooting in the smallest form of JPEG.


It was really hard to guess how often I should take the photo. This can all depend on how fast the object changes, and how much time I want the clip to last for. These two variables - which will change depending on light, heat, time of day etc... - is very hard to guess right. With trial and error, however, this started to make more sense, and I they came together really nicely.
Deciding what setting to use, is also another thing which depeds on what I was shooting. I really why I was reluctant to put it in full time manual, was becasue most of the things I was shooting changed in it's lighting. This means that if I started shooting something in the morning when it was slgihtly dark, it will be exposing for the same thing during mid day, which would mean it would be completely over exposed, but exposed for something at morning's light.
After trial and error, I decided to stay in manual, but, have my iso sensitivity at auto. This would mean nothing visual will obvioulsy change - apart from slight grain.
This could also mean that in the morning when I start the timelapse, and when it's still slightly dark, I could set my shutter speed at 1/400th of a second, 2.8, and ISO will be high. Although this will be grainy, this would give a lot of space for light to come and go. On the other hand, if I had settings at 2.8, 1/80th at iso 100, as it gets bright, the camera wouldn't have any setting to change which could make it any darker. This would mean that the image would get completely over exposed during the day, when it's a lot bright. But having the ISO sensitivity high in the morning, means that during the day - at it's brightest - the ISO can dip to something like 500, and then start heading up again in the evening.
Before I explored these settings, I tried the 'exposure softening' out in the timelapse menu. This would - supposubly - keep the exposure correct and smooth throughout the whole timelapse sequence. This didn't work, but instead, it threw the exposure levels back and forth, low and high, through different frames. This meant that when I came to put the exposures together, it appeared to be a flashing look, instead of a smooth, even exposure.

When I came to putting the images together in Premiere Pro, I put each timelapse image load sequence into their own seperate file (timeapse 1, 2, 3 etc...). I then went into Premiere Pro and went to import some footage. From this point, I went into the folder of what ever timelapse I'd like to put together, selected the first image, and then selected the 'image sequence' tick box. This woudl upload all of the images in that folder as a video clip. This would automatically do it at 25 frames per second, but I had the option to change it, which I did on some, if it was too quick or too long.
From this, all I had to do was order my clips into how ever way I wanted, add a title, and save as a quicktime file. One feature which I added to all of my clips, was a black 'crop' lines / border at the top and bottom. I really liked this effect, as it presented it's self as a cinematic video clip. I also added some roylety free music to make it more complete, and more interesting to look at for 3 minutes.

As I was photographing decay - the fruit part of my timelapse, I started by firstly presenting the fruit pile in a 'studio' formatt, on a white background / sheet of paper. This would make the end resautl seem more controlled, minimalist, and provide the majoirty of the attention onto the fruit., instead of anything else, which might be distracting or irrelevent.
I have decided to include all the fruit into one frame, so I can then shoot a load of photographs, then when I come to edit the fottage, I can use the same clips but crop into the frames. This will be no problem, as the amount of pixles used for viewing videos, are nothing compared to an image. This will also mean I won't have to have two different cameras, or do more than one shoot. This will save time, and the shots I will have to upload / process.
To work out how many frames I need to take over how long of a period of time, at what interval, I did some maths, which bought me to my answer.
Firstly, I thought of how long I will be wanting to shoot this for. As this is decay, I doubt that by the end of this shooting, that they would have decayed completely, but I will still get the process, hopefully.
I will be shooting this for twelve hours (over night). So to find out how many minutes this was, I did this equastion. 2 (minutes I need in video life) x 60 (seconds a minute) = 120
120 (seconds) x 25 frames (a second) = 3'000.
This tells me how many frames I need to capture throughout the duration of the 12 hours, to have a sturdy 2 minutes timelapse (plus other stuff I captured) at 25 frames per second.
Now what I need to work out, is how often I need to take the photographs (the interval)..

For this, I timed the hours of tihis timelapse by the 60, to work out how many minutes this was going to last for. This came to 420 minutes, of the duration.
I then timesed this by 60 again to work out how many seconds this was, this came to 25,200 seconds throughout the 7 hours.
I devided the seconds by how many frames I needed, to get the interval of each frame, this came to 8.4 seconds.
So I knew that when I came to set up my camera, in the Interval Shooting Mode, I knew my interval for each shot should be 8.4 seconds. However, I rounded this down to 8, just so I could have extra frames if needs be (I can always speed it up, but slowing it down, isn't an option, as this will make the clip laggy, and not fluid.)
Providing I don't run out of space, or battery, I should gain enough clips for a 2 - 3 minute of timelapse.

Like the previous timelapse, once I had downloaded all of the photographs and put them into all into one folder. When that's done, I came into premier pro, selected that first image in the folder, and clicked 'image sequence'. This made sure that every photograph in the folder (if they were taken one after the other) then they would be imported as a video.
From then, I would be able to crop, adjust speed, timings, duration, and colours.